教程:色彩校正与Avid媒体作曲家
This tutorial demonstrates how to leverage Avid's powerful and efficient color correction by working in Color Correction mode, which allows you quick access to its color grading features but keeps them out of the way while you're editing.
Avid has long been the overwhelming NLE of choice for major feature films and primetime scripted TV shows. One of the many strengths of Avid is the method of applying color correction. 在过去几年里, color correction has come to be used directly by editors instead of separately by colorists. It’s a process that can make the most obvious difference to your projects in the eyes of your clients, 所以知道怎么做是一件很好的事情, and it’s critical that your NLE allows you to do it easily and to do it well.
Most other NLEs either add color correction as an effect or a completely separate process that requires leaving the NLE then roundtripping back to the editor. 在狂热的, 色彩校正是一种模式, which allows you quick access to its features but keeps them out of the way while you're editing. 这真是两全其美.
Generally, you want to do color correction in context of the shots around it. That means color correction should really be a process done near the end of the edit. 但是我们都知道, 当我们认为最终编辑完成时, 总会有别的东西被调整.
在需要往返的系统中, 这要花很多时间, 需要专门的工作流程, 而且很少能正常或方便地工作. 在狂热的, though, you're a click of a button from updating the edit or the color correction.
在狂热的, you can do color correction using the same input tools that you use for editing, 比如鼠标、轨迹球或平板电脑. But if you want to increase efficiency by a quantum leap and impress your clients with a cool-looking interface, you can use something like the Avid Artist Color User Interface shown in 图1(下面). 我将在本教程中使用轨迹球, but when I need to do a lot of corrections as quickly as possible, I use the Artist Color to keep me in the moment and tweak stuff in the most convenient manner.
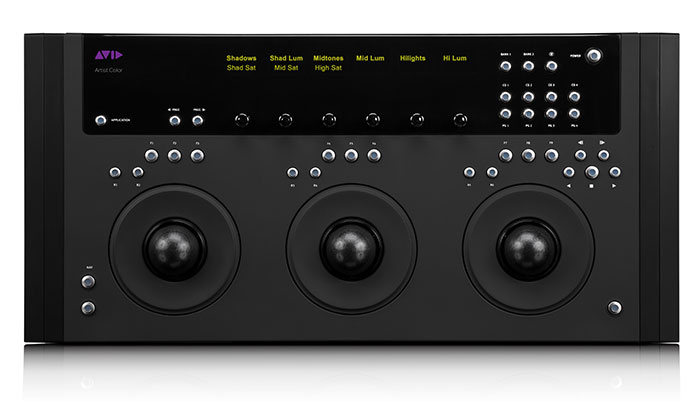
图1. Avid's Artist Color can increase your color correction efficiency.
开始在Avid色彩校正模式
让我们来看看色彩校正是如何在Avid中工作的.
序列显示在 图2(下面) added in Avid, there are two easy ways to start color correction.

图2. 我们将在本教程中使用的序列. 单击图像以查看其全尺寸.
从Windows下拉菜单(下面的图3) you can open a Color Correction workspace with all the tool layouts customized the way you like them. 或者你可以使用颜色校正模式按钮(图4,在图3下面), one of which is near the bottom left of the timeline under the Smart Tools. Both of these buttons are easily mapable to custom keyboard shortcuts.

图3. 通过Windows下拉打开颜色校正工作区.

图4. 通过单击按钮进入色彩校正模式.
在色彩校正模式下有三个窗口(下面的图5).
作曲家窗口
顶部是Composer窗口, same as in the Editing mode except there are three monitors instead of two. 默认模式, 这些会在中间显示你正在分级的镜头, 在序列左边的前一个镜头, 序列中右边的下一个镜头. You can make these monitors be anything you want, including a waveform monitor and a vectorscope. There are also controls below each window for navigating the timeline. You can see a split between your correction and the original with the button to the left. You can jump from one correction to the previous or next correction with the Next buttons. With no corrections made, these jump to the beginning and end of the sequence. 你可以只播放当前更正与播放按钮, and you can jump to the previous and next uncorrected shot with the Next To buttons. You can clear or undo or delete the correction with the Final button.

图5. 色彩校正模式. 单击图像以查看其全尺寸.
时间轴
底部是时间轴. It’s the same timeline you’re looking at in Editing mode and navigating through the timeline in Color Correction mode, 基本上和编辑是一样的吗. An important tip is to make sure that when you enter 色彩校正模式, you have the video track active that you want to color correct. Color correcting an empty filler layer above the track you want will actually apply that color correction to all the clips under that filler. 所以请注意,这可以用来做好事,也可以用来做坏事.
相关文章
Art of the Cut's 史蒂夫Hullfish explains how to customize your keyboard and keyboard shortcuts for smooth and streamlined editing in Avid Media Composer.